See how home automation can get you up in the morning. Watch the YouTube video here:
Table of Contents
Intro
Before you start, you’ll need two things:
- Raspberry Pi (and SD card and power supply) with Home Assistant installed
- Devices to control
You can learn how to install Home Assistant from the Home Assistant site or this helpful video by BRUH Automation.
Different devices connect to Home Assistant in different ways. Some devices, such as Philips Hue and Sonos Speakers, can be automatically detected and configured by the discovery component. Z-Wave devices can be connected using a USB stick plugged into the Raspberry Pi and some configuration in Home Assistant (BRUH Automation has a great video about this).
My alarm clock was inspired by this thread on the Home Assistant forums.
Interface
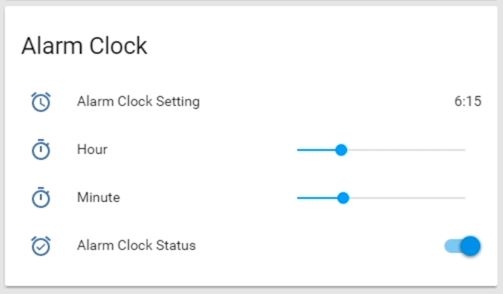
The first step is to create an alarm clock interface in Home Assistant. The interface is used to set the time for the alarm. Once the time is set, the alarm will go off each day — you won’t have to touch the interface again.
The interface will look like this:
Input Sliders
We use input sliders to set the hour and minute of the alarm clock. See below for code to paste at the bottom of your configuration.yaml file:
input_slider:
  alarm_clock_hour:
    initial: 6
    min: 0
    max: 23
    step: 1
  alarm_clock_minute:
    initial: 15
    min: 0
    max: 55
    step: 5
Notes: Unless otherwise noted, paste all the code to the bottom of your configuration.yaml file. Also, YAML is very picky about spaces. If your code isn’t working use YAML Lint to check if it’s valid.
Input Boolean
An input boolean is an easy way to make an on/off switch for the alarm:
input_boolean:
  alarm_clock_status:
    initial: on
Sensor
Now we need to add new “sensors” that format the current time and input slider values to make them easier to compare. There are several steps:
- Locate the
sensor:line in your configuration.yaml file. The code will go below this heading. - If there is one existing sensor such as
platform: yr, add a dash and a space before it to begin a list (i.e., it should change to- platform: yr). - Paste the code for the new sensors on the next line. The code is shown below:
- platform: time_date
display_options:
- 'time'
- platform: template
sensors:
alarm_clock_hour:
value_template: '{If you’re curious, here’s the purpose of each template sensor:
alarm_clock_hourformats the hour slider output as an integer to remove the decimal point and zerosalarm_clock_minutedoes the same for the minute slideralarm_clock_timecombines the hour slider and the minute slider into a single alarm clock setting that will be displayed in Home Assistant- The complex-looking code adds a 0 if there is only one minute digit (e.g., so it reads “6:05” instead of “6:5”)
alarm_clock_time_longcreates a version ofalarm_clock_timethat always has two digits for the hour- This format is needed to compare the alarm clock setting to the actual time from the
time_datesensor
- This format is needed to compare the alarm clock setting to the actual time from the
Group
Now that we have the inputs created, we’ll make the interface a little more organized. This code groups the alarm clock inputs into a single card in Home Assistant:
group:
# Alarm clock
  alarm_clock:
    name: 'Alarm Clock'
    entities:
      - sensor.alarm_clock_time
      - input_slider.alarm_clock_hour
      - input_slider.alarm_clock_minute
      - input_boolean.alarm_clock_status
Customize
This next code hides “sensors” that aren’t helpful to see and gives icons and better-looking names to the ones we do want to see.
Scroll to the top of the configuration.yaml file to paste the code at the end of the homeassistant: section. A good place is right below the time_zone: line if you haven’t made many changes to your configuration.
  customize:
    # Alarm clock sensors
    sensor.time:
      hidden: true
    sensor.alarm_clock_hour:
      hidden: true
    sensor.alarm_clock_minute:
      hidden: true
    sensor.alarm_clock_time_long:
      hidden: true
    sensor.alarm_clock_time:
      friendly_name: 'Alarm Clock Setting'
      icon: mdi:alarm
    # Alarm clock inputs
    input_slider.alarm_clock_hour:
      friendly_name: 'Hour'
      icon: mdi:timer
    input_slider.alarm_clock_minute:
      friendly_name: 'Minute'
      icon: mdi:timer
    input_boolean.alarm_clock_status:
      friendly_name: 'Alarm Clock Status'
      icon: mdi:alarm-check
Note: Ensure there are two spaces before customize: so Home Assistant recognizes the code as under the homeassistant: heading.
Script
Now we’ll write the script that will tell Home Assistant what to do when the alarm goes off:
script:
  wake_up:
    sequence:
      - service: light.turn_on
        data:
          entity_id: light.lux_lamp
          brightness: 255
          transition: 10
      - service: homeassistant.turn_off
        entity_id: switch.smart_switch1
Personalize the above code for your own configuration:
- Substitute the entity names of your own devices for
light.lux_lampandswitch.smart_switch1. - Adjust the
service:to fit your needs.- E.g., lights can be turned off with
light.turn_offand switches can be turned on withhomeassistant.turn_on
- E.g., lights can be turned off with
- For the
lightservice, usebrightness:andtransition:attributes for more customization.brightness:sets the brightness of the bulb on a 0-255 scale.transition:sets the number of seconds to transition to the new state.- Other light attributes are listed on the Home Assistant site (link).
Automation
This last step ties the interface and the scripts together:
automation:
- alias: 'Hue light on gradually with alarm'
hide_entity: False
trigger:
platform: template
value_template: '{The automation detects a trigger, such as being a certain time of day, and then runs an action, in this case script.wake_up. The condition: prevents the alarm clock from going off when it is turned off in the interface (i.e., the state of input_boolean.alarm_clock_status is “off”).
Next Steps
There are tons of ways to take this alarm clock further, including:
For the interface, you could use Tasker or one of the many Home Assistant components to set the alarm clock automatically using information from your phone.
For the scripts, you can adjust timing. For example, adding the line - delay: 00:05:00 before a service will delay it by 5 minutes (more information here).
For the automation, you can create conditions to prevent the alarm from going off on weekends.
This thread on the Home Assistant forums inspired my alarm clock and has many more great ideas.